There are several ways to write a weaving draft. In addition to giving information about threading, treadling and the tie-up, yarn thickness, color and weave structure can also be noted. There are also weaving drafts called profile drafts where each block represents a repeated threading/treadling order. Check out Kerstin’s website on profile drafts, Part 1 and Part 2. For an in-depth study of drafting, I recommend Madelyn van der Hoogt’s wonderful book, The Complete Book of Drafting for Handweavers. There is one other type of drafting used in designing weaving patterns that I would like to mention: network drafting, where a pattern line is often used as a starting point in designing on a network. The pattern line is to network drafting as the profile is to block drafting. For an in-depth study of network drafting, I recommend Alice Schlein’s acclaimed book, Network Drafting, An Introduction.
Below are a few very basic examples that illustrate how to read the weaving drafts on my blog. Variations of these examples appear in some of my posts as well as profile drafts and pattern lines. For lengthy and complex threading and treadling that is sometimes the case with parallel threading and networked drafts, a WIF file (weaving information file) that is generated by weaving software is the best way for weavers to share weaving drafts with each other. Some weaving software can also easily convert a profile draft into a thread-by-thread draft. I use Fiberworks PCW (Silver version) weaving software and most of the drafts you see on this blog were designed with this software.
*Note: all the drafts on my blog are for a rising shed loom
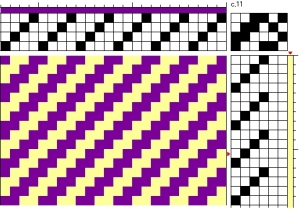
Example 1:
In order for the weaving pattern to look exactly the same as on the loom while you’re weaving it you need to view the draft as though you’re looking at the loom from the front, shaft #1 being the one closest to the reed.
The threading is shown on top, and if you’re threading left to right you would thread shafts 1, 2, 3, 4, 1, 2, 3, 4…
The tie-up, shown at the top right hand corner, if read left to right: treadle #1 tied to shafts 1&2, treadle #2 tied to shafts 2&3, treadle #3 tied to shafts #3&4, treadle #4 tied to shafts 1&4, treadle #5 tied to shafts 1&3, treadle #6 tied to shafts 2&4.
The treadling is shown on the right side and is best read from the bottom up because the weaving progresses upward. So in this twill pattern you would press treadles 1, 2, 3, 4, 1, 2, 3, 4… It can also be read from the top down and then the twill lines in the weaving will go in the opposite direction.
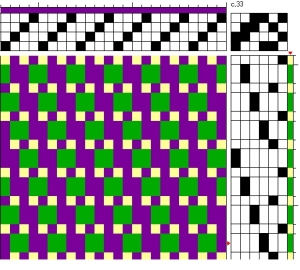
Example 2:
In this example color is noted on the top and side bars. The warp is all purple. The weft alternates green and yellow. Yarn thickness is noted on the side bar and in the treadle that is used – thick and thin wefts are used alternately, thin whenever treadles 5 or 6 are pressed, thick whenever treadles 1-4 are pressed.
Example 3:
This example illustrates that a plain weave pattern is formed when only treadles 5 & 6 are used.
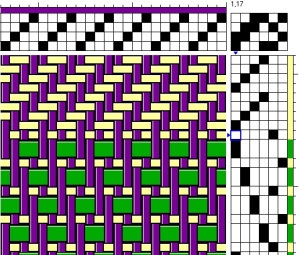
Example 4:
This example illustrates the structure of the weaves seen in the pattern. The top one is a twill, the bottom one is a twill using thicker yarn alternating with plain weave using thinner yarn. The structure shows where the warp and weft are in relation to each other.


